If you’re new to RVing, one of the most important skills to master is connecting to RV hookups. These hookups provide the essentials for comfortable living on the road, including power, water, and waste disposal. Many campgrounds and RV parks offer full or partial hookup options, meaning you’ll have access to various combinations of electricity, water, and sewer. Setting up your RV with these hookups can feel intimidating at first, but it’s a straightforward process once you understand the basics. Knowing how to properly connect and disconnect these utilities ensures that your RV stays safe, clean, and comfortable throughout your travels. In this guide, we’ll walk you through each type of hookup, explain what equipment you’ll need, and share practical tips to make the process easy and stress-free. Whether you’re heading to a popular RV resort or a rustic campground, this guide will help you set up like a pro.
What are RV Hookups?
RVs are like homes on wheels. Therefore, when staying in your RV you will require power, water, and waste disposal while at campsites. There are three main types of RV hookups—electric, water, and sewer—which can be found at various campgrounds, RV parks, and some designated rest areas.
- Electric Hookups: These provide power for the RV and are available in different amperages, typically 30 or 50 amps. They allow you to use appliances, charge devices, and run heating or air conditioning, making them essential for comfortable RV living.
- Water Hookups: A water hookup connects your RV to a campground’s water supply, giving you a steady flow of fresh water for sinks, showers, and toilets. This is especially convenient for extended stays and helps avoid relying on stored tank water.
- Septic Hookups: Septic hookups connect the RV’s waste system directly to a campground’s sewage system, allowing wastewater from the kitchen, bathroom, and toilet to flow out. This hookup is ideal for long stays since you won’t have to manually empty the waste tank as frequently.
Many campgrounds offer “full hookups,” meaning they provide all three, while others may only have partial hookups.
RV Electric Hookup
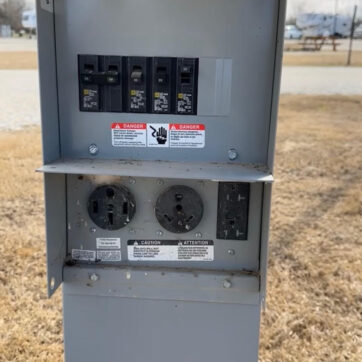
The RV electric hookup supplies power to your RV while at a campsite, allowing you to use appliances, lighting, and climate control. Typically, campsites offer hookups in 30-amp and 50-amp options, so it’s essential to know your RV’s electrical capacity to ensure compatibility. The 30-amp connection provides up to 3,600 watts, sufficient for smaller RVs or limited power use. The 50-amp option, delivering up to 12,000 watts, is ideal for larger RVs with multiple appliances.
Electric hookups provide a stable power source, removing the need to rely on generators or battery reserves.
To connect, you’ll need a power cord with the appropriate connection and sometimes an adapter. When setting up, ensure all breakers are off before connecting to avoid electrical surges.
With an electric hookup, you can enjoy all the conveniences of home on the road.
How to Hook Up Electric
To hook up electricity to an RV, follow these steps:
- Locate the RV Power Inlet: This is usually a 30-amp or 50-amp plug on your RV.
- Find the Power Pedestal at Your Campsite: The pedestal should have 30-amp or 50-amp outlets, depending on your RV’s needs.
- Plug in the RV Power Cord: Match the plug from the RV to the corresponding outlet on the pedestal.
- Turn on Power: Once connected, switch on the breaker at the pedestal and check if the RV’s electrical systems are working.
Ensure you have the correct adapter if the power sources don’t match. Always verify proper grounding and safety before using electricity.
RV Water Hookup
Setting up an RV water hookup is simple but essential for a comfortable stay. Start by locating the “city water connection” port on your RV, typically on the side or back. Attach a clean, drinking water-safe hose to this port, then connect the other end to the campground’s water spigot. Always use a water pressure regulator to prevent damage to your RV’s plumbing from high pressure. Many RVers also use a water filter to improve water quality. Once connected, turn on the water slowly, checking for any leaks. Remember to store your hose in a clean place when finished.
How to Hook Up Water
To hook up water to your RV, follow these steps:
Locate the Freshwater Inlet: This is typically on the side of your RV and labeled “City Water” or “Fresh Water.”
- Find the Water Supply Source: This is usually a hose bib at a campsite or an RV park.
- Use a Drinking Water Hose: Always use a hose rated for potable (drinking) water to avoid contamination. These hoses are typically white or blue.
- Connect the Hose: Attach one end of the hose to the water supply and the other to the RV’s freshwater inlet.
- Turn on the Water: Slowly open the valve, ensuring a steady flow.
- Check for Leaks: Inspect all connections to ensure there are no leaks.
Consider using a water pressure regulator to prevent damage to your RV’s plumbing for extended stays.
Septic RV Hookups
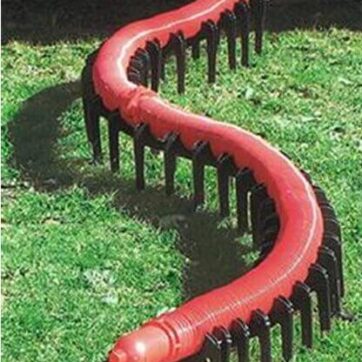
Connecting an RV to a septic hookup is straightforward with a few essential steps. Start by parking your RV close to the septic connection point and using wheel chocks to ensure stability. Gather your sewer hose and connect one end to the RV’s black tank valve, ensuring it’s securely attached to prevent any leaks. Then, connect the other end of the hose to the septic inlet. Many RV-friendly septic systems use a threaded adapter that screws onto the hose and connects snugly to the septic tank inlet.
Once securely attached, open the black tank valve first, allowing the waste to flow out. Once emptied, close the black tank valve and open the gray tank valve, allowing wastewater from sinks and showers to rinse the hose. This step keeps the hose cleaner and reduces odors. Finally, disconnect the hose carefully, secure the caps, and store it properly.
Make sure to always use gloves and have a small toolkit on hand in case adjustments are needed. Regularly inspect hoses and fittings for any signs of wear, as maintaining a clean, secure setup is key to a smooth RV septic experience.
How to Hookup RV Septic
To hook up the septic system to your RV, follow these steps:
Locate the Sewer Connection on Your RV: This is usually at the rear or side and has a cap that needs to be removed.
Find the Campsite Sewer Hookup: This is typically a 3-inch PVC pipe on the ground labeled “Sewer” or “Dump Station.”
- Get a Sewer Hose: Use a proper RV sewer hose to connect your RV to the campground’s sewer system. Ensure it’s hose-rated for waste disposal.
- Connect the Hose: Attach one end of the sewer hose to your RV’s waste outlet and the other to the campground’s sewer inlet.
- Open the Valves: Open the black (toilet) tank first and ensure it is empty. Next, open the gray (sink/showers) water valve, allowing waste water to rinse the hose of septic material.
Always use gloves and take care to maintain hygiene when handling sewer connections.
Our Experience with RV Hookups
Once you arrive at your RV site, you want to kook up your RV to enjoy its offers. We often split the work, have half the family hook up everything outside, and have the other half push out the slides and get the interior ready.
To fully enjoy your RV, you must know where your RV hookups are located.

