An RV campsite setup checklist turns a tiring campground arrival into a calm, repeatable routine. After a long travel day, excitement and fatigue can make it easy to rush, miss a low branch, forget the wheel chocks, or connect a utility in the wrong order. A simple sequence helps us slow down, protect the RV, and get to the best part of the evening sooner: relaxing at the campsite.
Most setup mistakes are not caused by a lack of experience. They happen when everyone is tired, the light is fading, or several people are trying to help at once. We learned that setup goes more smoothly when one person guides the RV and both travelers follow the same order every time. The goal is not to race. The goal is to finish without needing to undo a step later.
Before Entering the Campsite
Stop before backing or pulling fully into the site. If it is safe to do so, one person should get out and walk the entire space. Confirm the site number and determine where the RV must sit for the utility connections, awning, entry steps, and outdoor area to work together.
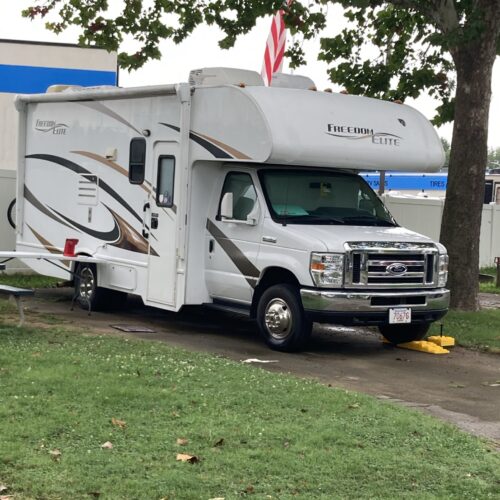
- Look up for tree limbs, wires, signs, and other overhead hazards.
- Locate the electric pedestal, water connection, sewer inlet, fire ring, and picnic table.
- Check the ground for soft areas, deep ruts, large rocks, roots, or a sharp slope.
- Estimate slide and awning clearance on both sides of the RV.
- Confirm that the entry steps will open onto firm ground and not into an obstacle.
- Decide on hand signals or phone communication before the driver begins moving.
Check Clearance Before You Commit
The best time to spot a clearance problem is before the RV is in position. Walk the likely path into the site and look at the full height, width, and rear swing of the rig. A branch that clears the roof may still strike an air conditioner, antenna, or awning. A utility pedestal may clear the RV body but interfere with an extended slide.
The spotter should remain visible in a mirror and never stand directly behind the RV. If the driver loses sight of the spotter, stop. Move slowly, use clear signals, and get out to look again whenever anything feels uncertain.
Position, Level, Chock, and Secure the RV
Positioning comes before hookups and outdoor setup. Line up the RV so the connections can reach without being stretched and the slides have room to open. Check side-to-side level first and use leveling blocks as appropriate for your RV. Once the final position is confirmed, set the parking brake, chock the wheels, and complete the manufacturer-recommended leveling and stabilizing process.
Never assume the campsite is level because it looks flat. Check the level before opening slides or settling into the RV. Follow the instructions for your specific motorhome, travel trailer, fifth wheel, leveling system, and slide mechanism; the correct sequence can vary by manufacturer.
Connect Electric Water and Sewer Safely
Once the RV is secure, move to the utilities. Inspect every connection before use and keep drinking-water equipment separate from sewer equipment. Our RV campsite setup checklist uses the same utility order each time so we are less likely to skip a basic safety check.
Electric Connection
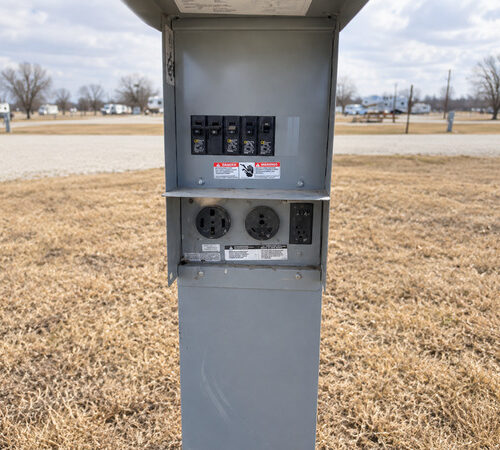
- Turn off the campground pedestal breaker before connecting.
- Inspect the outlet and cord for damage, heat marks, moisture, or loose parts.
- Use a properly rated surge protector or electrical management system.
- Connect the RV power cord securely, then turn on the pedestal breaker.
- Confirm that the RV is receiving the expected power before running major appliances.
Fresh Water Connection
- Use a potable-water hose reserved only for fresh water.
- Attach a pressure regulator and filter if they are part of your system.
- Briefly flush the campground spigot before connecting the hose.
- Check fittings for leaks and avoid leaving the hose where it can be damaged or create a trip hazard.
Sewer Connection
- Wear disposable gloves and inspect the sewer hose and fittings.
- Secure both ends of the hose and support it to create a gradual slope when needed.
- Keep the black tank valve closed during the stay unless your RV manufacturer directs otherwise.
- Follow your RV and campground procedures for tank use, dumping, rinsing, and disconnection.
For more background, read Understanding RV Hookups and our guide to RV Showering.
Open Slides and Complete the Interior Check
Before opening a slide, confirm the outside clearance one more time and check that nothing inside has shifted into its path. Open slides according to the RV manufacturer’s instructions. Then verify that cabinets, refrigerator doors, windows, and interior items stayed secure during travel. Turn on the systems you need and look for warning lights, leaks, unusual sounds, or anything that needs attention before the campsite is fully arranged.
Set Up the Outdoor Area Without Blocking Neighbors
With the RV stable and utilities connected, set out the entry mat, chairs, table, grill, and other outdoor equipment. Keep everything within the campsite boundary. Do not allow hoses, cords, vehicles, bikes, or games to extend into the road or a neighboring site. Maintain a safe distance between grills or campfires and the RV, awning, trees, and combustible items, and always follow campground fire rules.
A few thoughtfully chosen items make setup easier, but more gear does not always create a better campsite. See our Must Have RV Accessories and review RV Camping Etiquette before your next trip.
Get Our Free RV Adventure Guide and National Parks Checklist
A familiar arrival routine makes it easier to settle in after a long travel day. Our free Family RV Adventure Guide includes an RV arrival checklist you can keep handy as you inspect your site, position the RV, connect utilities, and complete your final walk-around.
Sign up to receive the guide and our 63 National Parks Checklist, along with practical RV tips and trip ideas by email.
Final Thoughts
A good RV campsite setup checklist does more than prevent forgotten steps. It gives everyone a clear job, reduces rushed decisions, and helps the campsite feel settled sooner. The exact equipment and sequence may change from one RV to another, but the basic rhythm remains the same: inspect, position, secure, connect, arrange, and check again.
Use this routine until it becomes familiar, and keep the printable checklist close on late arrivals or long travel days when fatigue makes small mistakes more likely. A few extra minutes at the beginning of the stay can protect the RV, respect neighboring campers, and leave more time for the campfire.